INDEX
Restoration History
1980 M535i
Other Projects
A few odds and ends before taking the big plunge. This was after we moved from Chicago to Minnesota.
I did this video way back in Chicago, trying to commemorate the hard work that went into the engine rebuild and long road to get the car running again. It’s very early youtube so forgive the picture quality!
Winter 2008/2009
This will be a big update because there’s an awful lot going on. As I’m prone to do, I think I started too many projects so now I need to tie it all together and finish some of these! Since I didn’t do much to the M535i last winter due to storage issues and our move from Chicago, I’m taking care of a lot of things.
Here’s what’s cooking:
- Gauge project where the e12 clock is
- Ackerman, bump steer spacers
- Brake system rebuild
- Finally install a fan shroud!
- Wire in headlight cleaning system
- Finally get oil dipstick mounted to filter boss
- New steering box and fluid flush
My brakes were really due for some attention. They stopped pretty well, but the front calipers were very ugly and the dust seals for the pistons fell apart in my hands. I’ve also wanted to do stainless steel lines for quite a while. I’ve removed all flexible brake lines, calipers, and even the master cylinder and brake booster (to get to the steering box easier) and maybe I’ll replace the mc and brake booster as well. They’re pricey though. The calipers were not fully disassembled because I found out the bolts are stretch types and the front caliper ones are NLA. So I cleaned them with the use of this great Evaporust stuff (it really works!) and painted them with VHT brake caliper paint (claims it is good to 900 F). I wanted to get flat black, but Autozone only had one can of silver so I decided it was o.k. but not my 1st choice. At least it wasn’t yellow (I never would have painted my calipers yellow!).
So far I have the rears painted and pistons/seals reassembled. I’m still working on the pain in the ass fronts to get the seals and pistons in and then paint them. Some of the stainless steel lines are on the car already as well.
(2019 update: a lot of this I ended up taking out or not finishing. The gauge was a piece of crap and I removed it, plus it didn’t suit the car. Also I still have yet to get the headlight cleaning system wired in).
Here are some pictures of the gauge setup. I also took this opportunity to repair some damage to the hvac controls. One of the fresh air vent sliders had broken off just leaving a nub (like that when I bought the car) and also one of the shafts connecting the hvac (the air temp on the left side) was broken behind the dash. So I took this whole thing apart and bought new parts for the fresh air vent sliders, new light bulbs for the control illumination, new control shaft, and of course my gauge project items.
I’m using PLX gauges (plxdevices) for this setup because it allows you to display multiple data points on one gauge. I didn’t want a gauge pod on the dash, or on the driver side pillar, or even in front of the shifter the way I did on my old e12 528i. The stock e12 gauge location is a standard, 52mm diamter since it’s a VDO clock. The only combination gauge I could find was a unit that had oil temp and oil pressure, which was pretty cool. But not nearly as cool as this PLX gauge. My plan is to do oil temp, oil pressure, coolant temp, and when I get a new exhaust, air fuel ratio through a wideband o2 sensor. I’m going to be using the back of the head for the oil pressure sender (including an an adaptor I bought to fit 1/8 NPT thread to the M12 thread on the back of the M30 head), drilling and tapping a hole by the oil filter housing, and drilling and tapping a hole in the thermostat housing. And then all the wiring to get it working.
I’m still in the process of getting the holes drilled and tapped and I have to figure out how I want to mount the gauge control boxes. They will go up under the dash where the glovebox is somehow, but I haven’t done it yet. I also need to have them stay accessible for a USB computer connection to configure anything later, and I plan to stash the remote in the storage area under the radio (tucked up behind the radio) when not in use.
I’m finally planning to install this new ZF steering rack in the car. It’s a remanufactured unit I won in the Windy City BMW Vintage Day raffle two years ago. Also it’s always bugged me that I never did anything to flush the power steering in this car since I bought it and who knows how old the fluid and filter are (yes, there is a power steering filter!).
So I ordered up a new filter ($30 from BMW, ouch) and plan to get this sucker in there. First I need to get the brake booster out of the way, but I’ve already sucked the power steering fluid out with an oven baster (very helpful to have in your tool box).
More updates when I make more progress!
Winter 2009/2010 Updates
Well, I’ve been seriously lacking on updates to this site lately. Having another kid born (Fiona, 1/6/2010) plus my son’s lack of afternoon naps (which were Dad’s time to go work in the garage) have seriously curtailed my car time. And work, and another old car (1987 E30), so much to do!
Updates to this when we last left off…. what a nightmare. Don’t change this many things over the winter and expect it to work! Holy hell, it was a mess. Car was puking fluids from so many places it was difficult to know where to begin. Power steering leaks, brake fluid leaks, oil leaks, and coolant leaks. Did I miss anything? Sheesh. Took half the summer with my reduced free time to track most of them down and I still have the power steering fluid issue although it’s slightly better.
The brake fluid leaks were coming from the reservoir cap over the master cylinder which was brand new. No idea why but I could not get the thing to seal. It took many, MANY times of taking it on and off and playing with the threads. And lots of cleanup every time.
The power steering was leaking from the hoses going to the steering box, the smaller one apparently the most. Retightening the bolts has come close to curing it but I think I need new crush washers. And maybe new bolts but they are NLA. I have the parts quote from Blunt Tech from r3vlimited but haven’t ordered them yet. Going to need another quart of Redline power steering fluid, damn.
I had oil leaking from the sender by the oil filter mounting boss and this was a bitch to fix. I finally ended up using the red (highest strength) loctite on the sender and got it nice and tight and let it set. No more oil but it was also a big mess to clean up… over and over… after every test drive.
I had a small leak by the sender that goes to the thermostat housing but this wasn’t nearly as bad as the oil temp sender.
So in summary the car was leaking worse than any Brit car and infuriating me every time I drove it. Oh and on top of all this, the damn PLX gauge powered up but could not find the senders. This really made me mad, like rip it out of the dash and throw it in the trash I was so frustrated mad. I left it in ther and eventually unplugged its power while I tracked down leaks to fix. Finally I got around to removing the gauge power unit and sender power units and sent them all back to PLX. They fixed them for free, forget which one was bad (one of the fluid temp or fluid pressure?). Oh and I can’t get the pressure sender to fit on the back of the head so it isn’t even hooked up. I need to make a short length of hose with the right fittings and then have that hang (well secure it somehow, zip ties again to the rescue) back by the firewall. So until then I don’t have oil pressure reading other than the gauge cluster idiot light.
Toward the end of the summer last year, the oil outstanding leak other than my old nemesis by the four corners (upper and lower timing chain covers, head, block) was the power steering one. So I didn’t drive the car a whole lot last year (but I did drive it enough to get a damn speeding ticket July 31st!!), but when I did, it was pretty good. Suspension was getting on my nerves and just too damn low in the front with the cut coil Racing Dynamics springs, but the steering with the new box was wonderful. Zero slop on center, nicely weighted, wow. A joy.
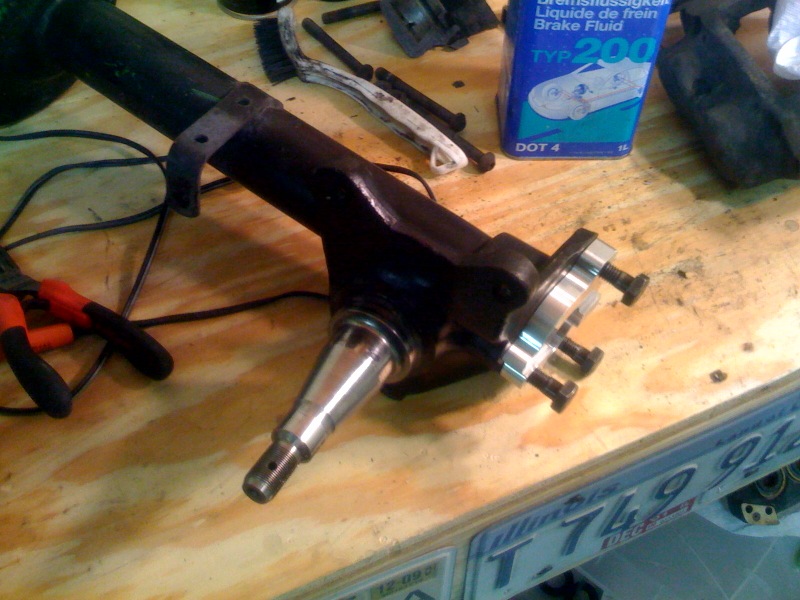
For last winter (Dec 2009 through Feb 2010) I decided to take on fewer projects knowing the time constraints and learning from last year’s marathon of crap that I did. Also with the new baby girl due in Jan 2010, I didn’t want to get to the alarming point of last year where Spring comes and I’m trying to get the car ready to run. In late Fall we had a nice warm sunny day and my wife gave me a wonderful gift of an entire Saturday to do car stuff. I think this was in Nov, but I obliged by devoting it to the E12 and ripping a lot of the front suspension out. I took out the strut tubes because the driver side one had a strange and scary bolt hole in the bottom that was stripped and it had a smaller bolt in there that somehow was threaded and seemed sort of tight through the steering knuckle. Yikes, always was in the back of my mind since I discovered it a few years ago. But doing something about it required lots of motivation because the front strut towers are (I believe, researched this months ago when this occurred and now typing in May 2010 so cut me some slack) only on the E12 M535i and the euro 635csi (early E12-based). I posted some wanted ads on bigcoupe.com and firstfives and mercifully received an email from Charles Iffland who sold me for an extremely fair price both front strut tubes from an 88k mile euro 635csi he parted years ago. They were shipped to me and you can see the tube in the picture below with the Ackerman spacer got AKG Motorsport in Illinois to make for me. So this is the long way of saying, on my long day with the e12 to work on it, I installed both new front strut tubes, the Ackerman spacers and their required longer bolts, and while I was at it, I removed both front and rear springs and put in my H&R springs that I bought 3 years ago! It was a long and exhausting day.
Over the winter, other projects including rebuilding the shift linkage on the car because the strange rubber gasket/doughnut at the back of the shifter plate towards the rear of the car up in the tunnel was toast. It started popping out late summer 2009 and shifting forward to 2nd gear in the close ratio was giving me a bad feeling because it was barely connected from the rubber doughnut deteriorating so much. The 2nd gear shift was almost causing the gear shift to hit the radio. Yikes. I took it apart late in August or Sept 2009 and thought I had it fixed. Somehow BMW changed the part of the foam core isolation piece between the shifter plate and the transmission tunnel. This foam trapezoid cheese wedge shaped thing didn’t fit in any configuration so I picked the best one and installed it, but it was a real bitch to get the new rubber doughnut in. Well it didn’t work and the new doughnut popped out a week or two after, plus the shifter position was off (back about 30+ degrees towards rear of car). So I gave up and left it until winter. Fast forward to after my suspension all day project, I finally tackled this. I took it all apart (again, I hate getting a 13mm wrench up under the driveshaft heat shield and around drive shaft to get that nut off the rubber doughnut bracket). I took the non-fitting cheese wedge foam piece and cut it down to about half until I was happy with the alignment and size relative to the 30+ year old one that fell to pieces when I removed it. I reinstalled and didn’t have to force anything with the rubber doughnut to line up and all is well for now.
NEXT, I decided it was time for a new master cylinder because I didn’t replace it with the brake fluid redo winter 2008/2009 and I still have mushy brakes. This was actually one of the easiest jobs I’ve ever done which I couldn’t believe. So when the springtime weather was hinting about an arrival, all I had to do was bleed the brakes and not do any frantic replacement of other crap or putting parts back together to get the car ready. The outside picture is from that first Spring run (we had an early spring this year).
This weekend was pretty productive because I finally reinstalled the PLX gauge boxes and got it all hooked up and located in a better place (back above trans tunnel behind center console, instead of up behind the glove box where I had it before). Got everything hooked up and it works…… sort of. I need to play with it some more and from the pic you can see it thinks I have two oil temp senders, but so far so good I think. Oil temp and water temp so far. I need to find out how to mess with this display to get rid of the vacuum reading since I don’t have that sender, and the extra oil temp. I also did the car’s yearly oil change with the not-so-fun bottom bolt oil filter canister.
You’ll notice that I’m running the wheels without centercaps. Well, also last summer not helping my mood, on one drive the left front which had been coming loose on me periodically finally flew off while driving never to be seen again in traffic. That’s an expensive mistake. I tracked down another centercap but it needs to be painted black to match. I’m thinking of redoing them all with silver centers so I’m holding off for now and just running the wheels naked.
2011/2012 Updates
Sadly not much to report. In 2011 I mostly just drove the car, until the tail end of driving season when there was a large clunk when I braked as I drove down my street. I jumped out and looked underneath and the damn urethane Grunts front radius rod bushings had cracked and the right front bushing flange had sheared off completely. This allowed the whole front to slide forward under braking, not quite sure how the tire and wheel didn’t hit the fender liner! I turned around and pulled it in the garage and I haven’t driven it since sadly (that was October 2011).
This past winter I didn’t do anything with it, but in the spring I started the bushing replacement finally. I have the left front done (I went back to the standard Motorsport bushings) but the car has been on jack stands the whole summer and for the first time since the engine rebuild I didn’t drive the car. I still have the right side bushing to do and hopefully I’ll get motivation at some point here.
May 2013 Updates
Well, it took long enough! My “system” for pressing in the new Motorsport bushing on the driver side didn’t work on the passenger side. The assembly I used stripped/seized and the whole thing was stuck in place without the bushing pressed in and I couldn’t back out the bolt or the nut! That was a demotivator so the car sat and sat and sat on jackstands. I finally worked on it a few months ago and using a grinder had to destroy the new Motorsport bushing and the bolt assembly to get it out of there. What a mess.
After getting another Motorsport bushing, and a very nice little tool from a firstfives member in Europe that he had made and then sold to me after he used it, I had what I needed. I had some time Memorial Day weekend to tackle it, and also I bought a set of Suspension Techniques swaybars a few months ago so I decided to put the front one in. The good news is the one-off tool was fantastic and I had the bushing pushed in within 10 minutes using a bit of liquid detergent to help ease it in.
Installing the front swaybar was a bitch since it is so fat that I had to lower the front subframe carefully to squeeze it in, and then it was very challenging to get the bolts/brackets lined up so the bolts would thread in. Finally got it though, bolted everything back together, and for the first time since Fall 2011 the car was resting on its wheels! Sheesh, I feel terrible but life has gotten real busy.
The new hood I’ve had for ages and due to an incident that was my fault dropping something on the old (bondo’d and bashed) hood, I put it on. Next for the car will be some evaluation for paint/body work so I figured what the hell and I put the hood on especially if it has to travel long distance for the work (much easier than shipping the hood).
After a little patience to get fuel flow, the car started right up and seemed pretty happy. Brakes work, back tires don’t seem flat-spotted. I washed her and did some other cleanup in the garage, will continue fixing some loose ends and make an appointment for the bodywork evaluation.
Also for anyone paying attention and reading my website, May marks 10 years that I’ve owned M535i chassis #4145018! Wow…. still can’t believe it’s been that long, but the web narrative and dates on this website don’t lie!