INDEX
Restoration History
1980 M535i
Engine Rebuild
Machine Shop & Reassembly
Late Oct, Nov 2004
The motor went to the machine shop on Saturday, October 23rd. Thanks go my friend Gavin Gray, another E12 nut like myself, we were able to load the block in the back of his station wagon and the rest of the stuff in the back of my car. We took it to the shop on Saturday morning and I talked to the machinist about what I wanted done. I am having the bottom-end completely balanced, the rods rebuilt and peened, and the head pretty much just checked and cleaned up. The block will be acid dipped and painted.
By Monday, when I brought the head over after I had forgotten it on Saturday (DOH!), they had already worked on the block and painted it. It looks real good but the machinist thinks due to some corrosion in the coolant passages that he’ll have to deck it a bit. The exact amount hasn’t been determined.
Due to the condition of the bores, which aren’t bad, but aren’t perfect, we think that an overbore is in the best interest of a good rebuild. I checked into oversized pistons from Mahle and the first oversize (.2mm) is $1200. The 2nd oversize, .4mm, is $1150. But I can get custom JE pistons that are forged instead of cast as the Mahles are for $800 or so. Plus another $150 for rings and I’ll be $250 cheaper than the Mahles, and I think have a better, lighter weight piston. This is the direction we’re probably going to take with things.
The rod rebuild hasn’t begun yet, but Ted (the machinist) checked the crank and I don’t need oversized bearings. So I ordered standard bearings for the mains and the gasket kits, minus the head gasket, for the motor. I will still need freeze plugs, misc dowels for the alignment of stuff on the motor like the head and oil pan, and the rod bearings.
After doing a lot of research, I’ve decided to go with the Frank Fahey crank hub. It isn’t cheap, but my old one was scored when the machine shop got it off of the crank (I couldn’t get it off no matter how hard I tried). So I was going to need a new one anyway, so I thought the Fahey hub was worth going with for the added insurance it gives against a catastrophy with the harmonic balancer. I also ordered the Sachs Sport clutch pressure plate that will be balanced along with the crankshaft and flywheel. And for the flywheel I went with an 8 1/2 pound aluminum unit from JR Racing. With that flywheel and the JE pistons, the motor should rev a bit quicker and be fun. It wasn’t cost effective to remove enough material from my old flywheel to make it try to compete with the 8 1/2 pound aluminum one. And the makers of the flywheel recommended that I go with the performance clutch to go with it. The clutch pressure plate is on back order though and won’t come until late Nov.
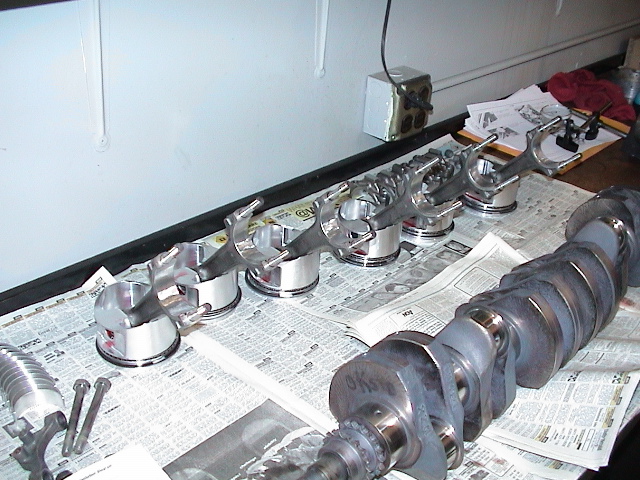
Picture are the flywheel which is now at the machine shop, the crank that has been cleaned up, the block which was cleaned and painted, and the head which was cleaned and flow tested (perfect, no cracks, no warpage, seals perfectly and the cam isn’t that worn). Hopefully next week when our contact returns to JE from the SEMA show Ted and he can coordinate what kind of pistons we’re going to have built for my motor!
Mid-Nov 2004
The work on the motor at the machine shop is progressing nicely. The machinist has told me that the crank is in excellent shape and I only needed standard sized bearings for the rebuild. Now I have all of the bearings, mains, rods, and also new rod hardware in the form of bolts and nuts. I considered going with ARP for them, but they had nothing off the shelf and the costs to get something custom were outrageous. I’m sure BMW OEM will be fine. Measurements and a lot of discussion has commenced and the pistons have been ordered. I ordered custom made pistons from JE which should take a few weeks. Ted, the machinist, handled the ordering process including sending an old piston to JE and making a mold of the combustion chamber of the head. We are targeting a compression bump from 9.3:1 to 9.75:1. According to the machinist’s calculations though, the head has already been shaved by a previous owner and compression was already close to 9.6:1. So we’re not really bumping it that much. The new pistons from JE will be 93.47mm where stock is 93.4mm. This only results in a slight overbore of 0.07mm. First oversize Mahle OEM pistons would be .2mm larger so this will actually be a smaller displacement and overbore bump than if I had gone with OEM Mahle pistons. Nice!
I also have purchased the Frank Fahey crank hub for safety and added assurance to my new motor when it is put together. The machine shop will be putting the lower timing chain cover on and the crank hub and pully to ensure that the proper torque (318-325 lb/ft) is applied. I dropped off the Fahey crank hub along with the Sachs Sport pressure plate so that this can be balanced with the crank and bottom end. I still need to get the pully and hardware for connecting it all to the crank hub along with the harmonic balancer. The machinist explained that he will balance some of the parts on their own to make sure they are in good shape. Then he will balance everything as a whole. The reason for that is that if I changed one thing, i.e. the harmonic balancer, that way it wouldn’t disrupt the whole equation if everything else was very nearly balanced on its own.
Last weekend, Nov 6th and 7th, I disassembled the entire front end and suspension to clean up the subframe and replace some worn out parts. I replaced the front control arms, cleaned and repainted portions of the front subframe, put in the Grunts radius rod bushings that I’ve had sitting around forever, installed Alpina springs that I’ve had for a while, Bilstein Sports, and K-mac front camber plates. It was a huge amount of work, but I also crossed many things off the list of things to do. The old tie rods were rusted and non-adjustable so I will be putting new ones in including a new center link. It should drive like a new car! Unfortunately, when I removed the springs and shocks on the front I discovered that what was in there was not the original stuff. This is unfortunate because these items are specific to the M535i and I had planned to set them aside to keep. The car had KYB front shocks that someone had put in and I’m not sure what kind of springs.
Tonight, Nov 18th, as a follow-up to the front subframe removal, I noticed that the bolts holding the subframe in were not in great shape. I sourced new one, for the great price of $1 each (there are four of them) for added piece of mind. Also I put in new 17mm bolts under the strut housing where it connects to the steering hub. One was so rusted during the subframe and suspension removal weekend, that it had to be ground off. And the others weren’t in great shape either. So tonight I swapped in the new hardware for the rusty hardware. And I installed new motor mounts. I couldn’t believe how much of a difference there is between the old mounts and the new ones in height! See for yourself in the pictures.
Finally, the other day with all this going on, I finally finished the front airdam install. This included getting the rubber bumper strips mounted to the airdam body and my own addition, the euro license plate.
Dec 2004
The motor is nearly finished. I stopped at the machinist’s today (Dec 7th) and all components are balanced, the rods have been peened and rebuilt, the pistons arrived from JE, the block has been bored, and the block is also painted. All that is left is reassembly.
There was a small hiccup last week when the machinist called to say that he found some small cracks in the block. They are on two of the cylinders, from the head bolt holes to the coolant passages. He said he didn’t think they were that worrysome because of their size and since they didn’t go to any of the bores. I spoke to several BMW “L” block owners and experts in the E12 M535i and firstfives E12 group and for the most part, everyone told me not to worry. Which is good because the block would have been very expensive to replace. And I just don’t want to go without the original block on the car. I don’t necessarily think it will enhance the value, but I think it is neat that the car has the original block (and head as far as I can tell, the casting date on the head is 1980 and it has “M90” cast into one side also).
I’m in no rush, but the machinist said the motor might be ready next week. If it’s possible, I might try to pick it up before Christmas and get it home. It won’t be that exciting though because it’s just going back on the engine stand to finish the build. It’s still a ways from going back into the car.
Dec 2004/Jan 2005
The motor came back from the machine shop in mid-Dec. Gavin Gray from the Chicago E12 group was a good friend to have as he helped me transport things back home. The short block surprisingly wasn’t that heavy for two guys to lift. We got it positioned near the tail gate of his Subaru station wagon, I attached the arms that hold it to the engine stand (with the arm assembly removed from the head of the engine stand) and then we lifted it onto the stand and the arm thing back into its slot. Slid the handle back in the stand and the cotter pin, and we were done. No sweat really.
It’s late January and I haven’t done much because it has just been too cold outside. I put in the front urethane swaybar endlinks but that was because it was an easy enough job. I still need to do the rears. The engine is just sitting on the stand wrapped in plastic wrap from the machine shop ready to have the head mounted and the rest of the assembly with the timing cover and oil pan finished. Hopefully in the springtime I can get this process going again! I have the gasket sealants/prep and thread locking compound ready to go. Also the few misc parts like dowels to hold the head gasket on the deck of the block and a new timing chain tensioner are (or will be very soon) ready to go. The pics show the finished bottom end at the machine shop as I picked it up along with the engine waiting to be finished now sitting in my garage.
April 2005
It’s been a long time since any updates, mostly due to my unheated garage and Chicago winter temps in January through March. The pictures here are of me, Dave Rutkowski, and Gavin Gray who came over to help me in early April to get the head mounted on the short block. Dave has a euro 635csi (early E12 based E24) with the “L” block 3453cc motor I have. He just rebuilt it in 2002 so his knowledge of the engine is very fresh. Gavin came to hang out and see my new M5 and offer moral support. Gavin is a fellow E12 owner who has helped me with this engine rebuild saga before. I’m the guy in the blue BMW Williams hat, Dave is leaning over the motor, and Gavin is peeking at what we’re doing.
We got the head mounted and the lower timing chain cover back on after having to remove it because the machine shop didn’t put the tensioner rail in right. Frustrating because this necessitated removing the monster, 325 lb/ft 36mm nut to get the cover off. So we torqued it back as best we could with a long lever (conduit bender end on the end of my breaker bar).
Other updates are from this weekend (April 15th) when I put the upper timing chain cover on (not pictured) and discovered I’m missing some bolts that hold the oil pump on. A trip to the dealer this week should rectify that quite easily.
May 2005 – June 2005
Following the help getting the head installed on the motor, I wrapped up installation of the timing chain covers, rear main seal, oil pan, and other misc items. If you notice in the pictures, I forgot to install the alternator bracket so the harmonic balancer will have to come off again to get that in place. Around this time the rear Bilstein sports and Alpina rear springs were put in. I held off on the rear camber plates for now but I have them still to put in later.
After I got the long block finished, I borrowed an engine hoist from my good friend Bob Smith (see his Jag under the Friends Cars section of this site). Once I had the hoist, I was anxious to get the engine back in the car. I mounted the flywheel using the recommended torque for the flywheel bolts (AND threadlock). I also mounted the water pump and the bracket used for attaching the hoist to the motor in the front so I was ready to go. I borrowed a pilot bearing puller from Alex Lipowich who lives in the Chicago burbs and I know through a BMW friend (Alex has an E36 M3 LTW racecar and an E34 M5). Using the puller and Alex’s slide hammer, I easily got the old pilot bearing out and put the new Sachs one in.
The lift wasn’t bad, but getting the motor to line with the rubber engine mounts was a challenge. It took a lot of swearing and sweating but it finally slid in where it should have. I used a cardboard box between the motor and firewall to protect the aluminum flywheel.
The engine hoist happened a week before the awful, 2005 US Grand Prix Formula One FARCE (my dedication to F1 has been seriously undermined after 6 straight years of attendance at Indy). My friend Al Denovan from firstfives was coming from Australia to visit in Chicago and go to the F1 race with me. Al also owns an E12 M535i, except his is RHD. Al and I did some E12 bonding when he came and he helped me get the transmission in. First I carefully mounted the pressure plate and disc to the aluminum flywheel, being very careful with torque so not to go above 20 lb/ft and rip out the helicoils. Once that was done (I had to buy the clutch alignment tool to get the disc centered), we used a jack to get the tranny into position. This was a big pain since it would not slide all the way in due to motor and tranny misalignment preventing the input shaft from popping into the center of the pilot bearing. After 45 minutes to an hour of hard work, shifting of things, and retries, it slid in.
July 2005
Now that the motor and tranny are in, it’s time to finish all the other misc items and there are a lot of them. I have put in the shift linkage in, driveshaft, and exhaust. The exhaust was a bear of course but better with both ends of the car lifted up in the air (with jack stands of course as a safety fallback) to get under there. All exhaust hangars were replaced with brand new items. Many items and hardware now are getting replaced with new. Some of the bellhousing bolts were in bad shape so new ones were put in. The tiny nuts that hold the intake manifold to the head are new. If you notice the intake manifold is super clean, that’s because it was cleaned by the machine shop and not sand blasted as some other parts were. So with a clean manifold, it would look terrible to use the same hardware, and the new nuts are so cheap. I’ve been using Patrick BMW in Schaumburg’s parts department who have been very patient and helpful. Most everything has to be ordered though so there is no instant gratification.
The thermostat housing was cleaned by me so it isn’t as good as the rest of the intake, but it’s o.k.. I took it apart and put in new gaskets from the top-end gasket kit. There are so many gaskets on this motor to be replaced it’s a challenge to remember them on during re-installation. The thermostat housing was just one example. The intake manifold alone has a large number of gaskets, some from the manifold, some from fuel injectors and other attachments. Speaking of injectors, they should be coming soon after getting cleaned and blueprinted/balanced by injector.com. All new copper nuts were used for the exhaust assemblies, as shown in the pictures.
I am also waiting on a coolant hose replacement kit from BMP and new hose clamps. Then the project will start to see some real progress. The starter went in the other day and was quite simple. I still need to pull the harmonic balancer again before the radiator goes in to get the alternator bracket in place.
She’s coming together and the pace is quickening now since summer is half over and I still want to drive her before the season ends! There are still a few loose ends like the oil cooler lines, but things are getting much closer now. I celebrated today’s progress (driveshaft, exhaust) by wheeling her out for some photos.