INDEX
Restoration History
1980 M535i
Rear Bodywork
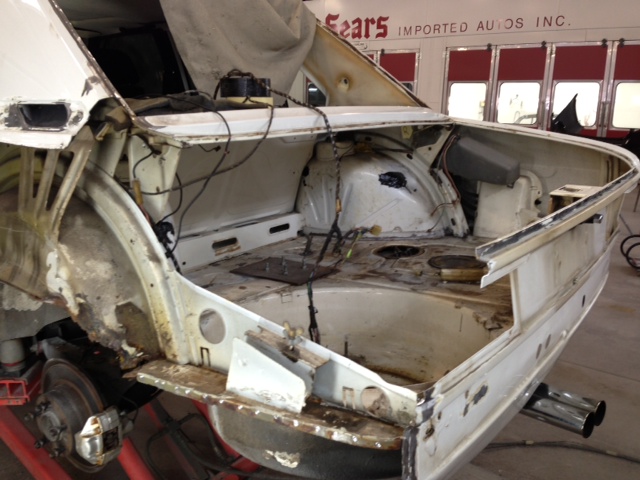
The great bodywork and rust replacement saga begins with the back third of the car.
2013-2014 Phase One
Phase 1 Overview:
Rust repair in rear shock towers, wheel arches, and quarter panels.
Diff mount/trunk floor repair and strengthening
Trailer hitch/trunk floor/tail light panel welding repair
Fix rust in rear window channel, particularly bubbles passenger side, bottom corner
Roll rear fenders on the new panels to clear 9″ wide BBS wheels
Replace trunk lid because someone drilled a large hole under the Roundel
Eliminate Federalized side markers in quarter panels
Replacement panels:
- WHEEL ARCH OUTER REAR LEFT 41141816315
- WHEEL ARCH OUTER REAR RIGHT 41141816316
- LEFT REAR INNER WHEELHOUSE 41141900757
- RIGHT REAR INNER WHEELHOUSE 41141900758
- CORNER PLATE WHEEL HOUSING REAR LEFT 1 41141820495 (didn’t use this)
- CORNER PLATE WHEEL HOUSING REAR RIGHT 1 41141820496 (didn’t use this)
- RIGHT REAR SIDE PANEL 41351864036
- LEFT REAR SIDE PANEL 41351864359
- FILL-IN FLAP 51171864759 25.36
- FLOOR PANEL TRUNK LATERAL 41121932991
- FLOOR PANEL TRUNK LATERAL 41121934418
- CROSS MEMBER REAR AXLE CARRIER 41121823084
- REAR WINDOW FRAME BOTTOM PART 41321881522
- TAIL PANEL 41341862486
- PARTITION LEFT 41131820497
- Trunk lid 41621828939 (not new/sourced from parts car)
This phase started with what I thought was a very realistic assessment of how much work would be involved, and that there was a lot of rust. But I wasn’t even prepared for how extensive the repair would be, which ended up requiring a full rebuild of the entire back of the car. I learned that the car was really unsafe to drive at more than a parade speed, and the extent of metal fatigue (and failure in the trunk/diff mount area) explains why the car’s body creaked so much over bumps like the curb at the end of my driveway!
Also the availability of nearly every panel in the back of the car made this much more doable than it would have been without. There was little to no fabrication required, but the bodyshop took great care to disassemble the car in phases so the rear structure would not collapse in on itself. We also had to reuse the flat piece immediately behind the back seats because it was no longer available from any sources. Paul removed it and reworked it to correct some of the bends and metal fatigue, also utilizing the new under trunk lateral support piece and channel to increase structural rigidity. In other words, the diff mount should be a solid work of art and will stand the test of time.
Paul also was able to weld in new metal and integrate the new rear window channel piece where there was rust to completely repair that area. There may be other items I’m forgetting or glossing over. Like how challenging it was for Paul to get the inner wheel houses squeezed in and welded in place.
Here are the pictures that show how they trimmed the insides of the quarters to clear the wheels/tires.
Some of the strengthening they did on the lateral (driver side crossing over to passenger side) piece is between the channel so I it may be hard to see it.
Look at part # 4 they used and the left to right side channel there. The space in between is covered by the trunk floor, but that’s where they put in a cross piece or metal bar to give it greater rigidity.