INDEX
Restoration History
1980 M535i
Engine Rebuild
Removal and disassembly
June, July, August 2004
Well, unfortunately there’s a big update that I’ve been meaning to do for a while. In late June, I went for a drive in the car and when I returned home after giving it a fun thrashing, I was leaking oil down the driveway. Not small drips either. The low oil pressure light never came on though so I can safely say nothing catostrophic happened. I haven’t found out the culprit for sure, but I think possibly a leaking rear main seal or something on the head. Those are my guesses so far.
As I updated earlier on the car’s history, in April of 2004 I had the oil pump replaced and Ben Thongsai who did the work said the motor was on borrowed time. My car has 164K on the odometer, but he and I suspect it may have closer to 200K, probably as a result of a reset to zero odometer when the car was brought into the US in 1985. In particular the rod bearings were junk and he said that was part of the reason for my low oil pressure issues in the summer of 2003. He also noted that the motor had two mismatched connecting rods which were from a later 80’s 3.5l M30 engine. Wonderful…. I had been hoping the car would make it through another summer of some fun, low miles, and cruising but with the oil leak, I said screw-it, let’s do this thing right. It’s rebuild time!
I knew it would take me a while to disassemble everything and get the engine ready to pull. That leaves lots of time to save up some money for this process. A lot of affordability will depend on whether the engine needs new pistons. At a minimum I want to fully balance the bottom end and of course get two matching connecting rods to go with the set. If pistons are in order, I will have to make a determination whether to run stock Mahles (probably oversize) or go aftermarket. Other possible tuning options exist, but of course add cost to the rebuild. The car was already fast to begin with, so it can’t be any worse with a freshly rebuilt motor featuring (of all things!) matching connecting rods.
This section of the writeup will be devoted to the pre-pull process. After the motor is out and the dissassembly of that begins, I’ll take more pictures in another section. The process has been a great learning experience so far and I’ve cataloged every part as I’ve removed it in labeled, ziploc bags. That’s the ONLY way you can do this. Oh, and lots of pictures help, too. Of note are a few things:
The exhaust removal was not that bad, particularly the exhaust manifold to exhaust bolts, which have an awful reputation for rust. A ton of WD40 and letting them sit for 24 hours rendered them helpless to some modest torque with a socket wrench.
I sure wish I’d just drained the coolant first off rather than having small drips as I went along. The bolt was obscured by the exhaust so I decided to leave it. Consequently anytime the car’s pitch changed (or the engine position changed during the tranny removal) some coolant dripped out on the floor. The one 19mm bolt is towards the back of the block, passenger-side, underneath the exhaust manifold. Be prepared with a big bucket (like 5 gallon) to catch it all.
The driveshaft removal was a pain as even with the center bearing support removed, the universal joint didn’t want to allow the shaft to pop out of the guibo. Finally with some gentle but firm action with a prybar on the guibo the driveshaft popped out.
The tranny removal wasn’t that bad as long as you remove the bell housing as well. I wanted to remove the tranny alone from the bellhousing, but the top 19mm nuts holding the tranny on were designed to fit in a location engineered by satan. The casting of the tranny interfers with a socket, so you can’t get them off that way. Even a 12 point won’t fit on enough to grab. The bolts are too close to the body of the tranny to have a box-end wrench fit either. And an open-end wrench will do no good as the transmission tunnel doesn’t give you enough room to work!! Supposedly an S-shaped open-end wrench will do it, but screw that. Remove the bell housing bolts, which are I think 3 or 4 13mm and 3 17mm’s. Easy, easy, easy aside from the tugging and weight of the tranny to move around. I’m glad I didn’t try my half-baked idea to lay underneath it instead of using a jack. And to do it by myself. Duh. My neighbor who used to be an auto mechanic helped me pull the tranny with both of us tugging and the jack supporting it. We gently brought it to the ground without issue.
After telling my neighbor how I was going to leave the tranny fluid in since it wasn’t getting rebuilt or anything, I stupidly turned the tranny over to remove the crossbrace bolt and fluid slowly poured onto the work bench from some kind of small seep hole on the top of the tranny. As long as the tranny isn’t placed in a dumbass position (i.e. upside down) it won’t leak. I don’t know the purpose of that hole, but it screwed me out of a 1/4 quart of Redline MTL.
September/October 2004
Well, even more has happened since the pictures above. I have pulled the engine out of the car and completely disassembled it. Things look pretty good to my untrained eye. But only the final word from the machine shop will tell the story.
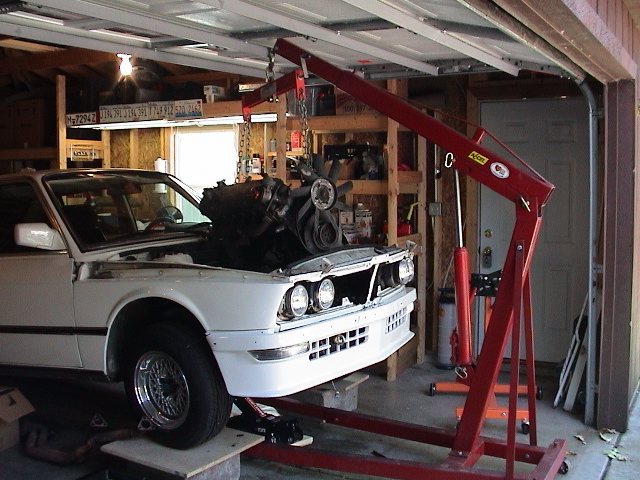
The motor lifted out fairly cleanly when my friend Jim Potsch who is an E3 Bavaria nut came over with his engine hoist. The clutch assembly made it a tight fit, but it was ready to come out. Unfortunately, the hoist was hitting the garage door and I had run out of height! Even when we lowered the car’s wheels to the ground. So eureka, I thought of a solution. Since we couldn’t get the engine hoist out of the garage as it was against the garage door and wedged in there, we elected to push my car back away from the engine and leave the hoist stationary. Thank god I had room behind the car to push it back a few feet. This worked beautifully and I had my engine out.
The plan was then to attach the motor to the engine stand I bought, but my wife and I were going to a picnic that morning and I felt rushed. Jim graciously let me keep the hoist an extra week until I was ready to mount the engine to the stand myself. I wanted time to evaluate which points to moun the four arms on the stand to and make sure it was all good. A rushed job could have been disastrous!
Notice how dirty the engine bay is! We’ll take care of that soon enough.
The process started to pull it apart before I had secured it to the stand. First, off with its head! Some of the head studs looked ugly; messed up threads and most had pitting and some gashes on the sides. They won’t be going back in. I felt better about pulling the head first as that was less weight on the stand.
The oil pan is missing a small chunk where the bottom of the alternator bracket bolts on. I guess I’ll get a new pan?? Sucks!
The tops of the pistons have a fair amount of carbon buildup, but other than that, they look pretty decent. The head looks nice, too, but I’ll still have the machine shop go through it.
Note the fresh, shiny, brand-new oil pump and timing chain. They are both less than a year old.
During the removal of the water pump, one of the bolt heads sheered off leaving the stud still stuck in the block. Wonderful. So I got out the drill, and proceeded to drill out the water pump housing around the stud until I could break the water pump off. Once it came off, the stud was exposed and I grabbed it with some vise grips to remove it from the block. It came out easily and didn’t leave anything behind in the block! Scary moment for me. Note all the silver shavings in the bottom picture from drilling out the water pump.
This is the contraption I had to rig up to get the whomper 36mm nut off the end of the crank that holds the harmonic balancer on. This bitch of a nut is held on with 325 lb/ft of torque!! Jeez. I used a bunch of 2×4″‘s to secure the engine stand as I exerted torque on the nut. I used the pole from my conduit bender on the end of the 20″ breaker bar (1/2″ drive) to get leverage. After several failed attemps earlier in the week, I used the cinder blocks and the longer 2×4 going up to the garage door header. There wasn’t any way I was going to lift my garage of course so this finally braced things. But I still couldn’t get it off. I used a propane torch to heat up the nut and then after bouncing with all my weight on the end of the conduit bar and breaker bar, it popped off. Words can’t describe what a pain in the ass this was!
Then I pulled the pistons and rods out and set them on my workbench, careful to keep all the bearings and rod-ends as a set and labeled which bore they came out of.
I don’t have pics of it, but the fun didn’t end with the 36mm nut. The harmonic balancer still woudln’t come off as it was fused to the crank hub. After lots of heating, bending, and prying the balancer finally came off, but the damn crank nut was still on. I could not get this off and I ended up breaking the lower timing chain cover trying to use a screwdriver and prybar wedged between the cover and the crank hub to get it off. So I’ll have to get a new lower timing chain cover now. And the damn crank hub is STILL on the crank! The machine shop will have to deal with it. I can’t get the f’er off.
What’s that awful smell!!?? Oh my god, run!! Adam’s pulling main caps! For some reason, the engine must have saved up the nastiest fart-smelling oil in the main bearing caps because as the bolts came out, the smell was released. It was terrible. And you thought the rear-end fluid in the diff could smell bad. This was foul. I showered afterwords to make sure the smell wasn’t in my hair!
The crank lifted out easily and I put it on my workbench. Note the f’ing crank hub and lower timing cover seal still on the shaft! The bare shortblock is now sitting on the engine stand with nothing left to do.
Time to get everything to the machine shop!
October 9th, 2004
It’s time to start cleaning!! I pushed the car out of the garage and angled it towards the edge of our driveway. I also put a tarp underneath to catch all the filth so it wouldn’t sit on our nice brick driveway. Then I got out a plastic bristled scrubber, a few SOS pads, and the Simple green and started scrubbing away. I used the hose to spray things down between scrubbings. I had to unbolt the steering box to get against the frame rail, but it’s still very tight in there. There’s a lot of cleaning left to do on the driver’s side, particularly under the brake master cylinder and brake booster. It’s very tight in there. But the frame rails are no longer black … they’re white like the car! Nice! I think this is only round #1 and there will be another engine cleaning party coming up.
I did work on the battery tray. I think some dumbass painted it black!! Moron previous owners.
My next posting of pics and info will be after the engine gets to the machine shop.